 sunny@connietinbox.com
 2-Piece Tin Can
 3-Piece Tin Can
 Canned Fish
 Canned Vegetables
 Canned Fruit
 Canned Pet Food
Introduction
Custom tin can printing plays a crucial role in branding and marketing strategies for businesses across various industries. The ability to customize tin cans with eye-catching designs, logos, and messaging helps companies establish a strong brand presence and captivate the attention of their target audience. In this guide, we will explore the world of custom tin can printing techniques, providing you with a comprehensive understanding of the various methods available and their implications for your brand. Whether you're a business owner, a marketer, or a packaging enthusiast, this guide will equip you with valuable insights and practical knowledge to make informed decisions when it comes to custom tin can printing.
Understanding Custom Tin Can Printing

Custom tin can printing is the process of applying personalized designs, graphics, logos, and messaging onto tin cans to create unique and visually appealing packaging solutions. It allows businesses to showcase their brand identity and communicate their message effectively to consumers. Here, we will explore the various aspects of custom tin can printing and its significance in branding and marketing.
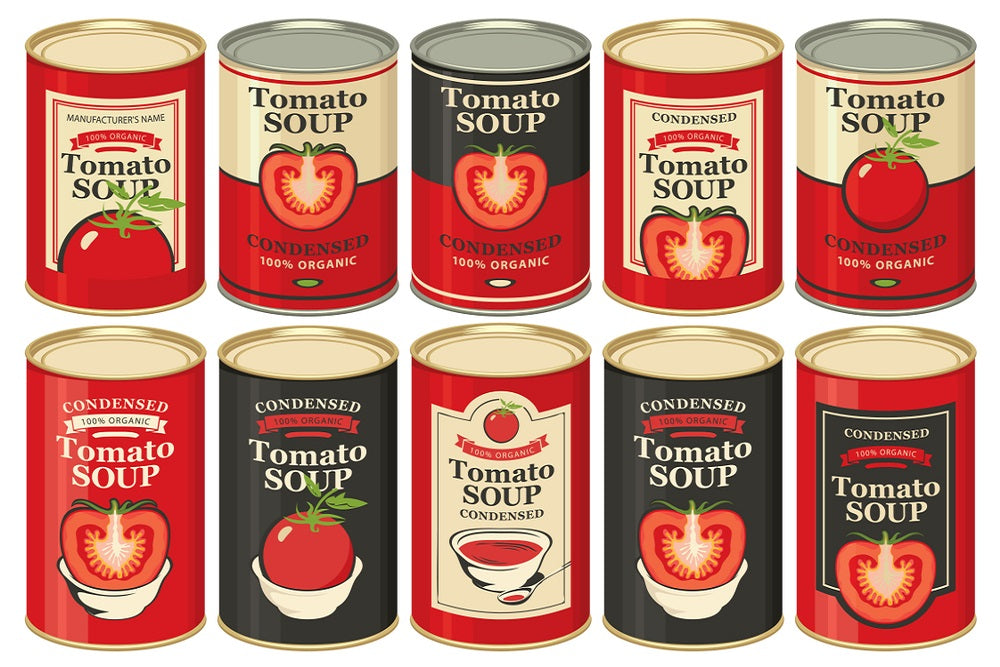
Overview of the Customization Options Available for Tin Cans

Image Source: Pinterest
Full-wrap Printing - This option involves printing on the entire surface of the tin can, providing maximum space for creative designs and branding elements.

Partial Printing - Partial printing allows for specific areas of the tin can to be customized, leaving some parts as the base color of the can.

Spot Printing - Spot printing involves applying designs or branding elements to specific spots or sections of the tin can, highlighting key features or messages.
Importance of High-Quality Printing in Enhancing Brand Visibility

Brand Recognition - Custom tin can printing helps create a distinct visual identity for your brand, making it easily recognizable and memorable among consumers.
Consumer Perception - High-quality printing reflects professionalism and attention to detail, which enhances consumer confidence in your brand and product.
Differentiation - Custom tin can printing allows your packaging to stand out on store shelves, attracting attention and distinguishing your brand from competitors.
Factors to Consider When Choosing Printing Techniques for Tin Cans

Design Complexity - Consider the intricacy and detail level of your design, as certain printing techniques may be better suited for complex artwork or fine details.
Quantity and Cost - Different printing techniques have varying costs, and the volume of tin cans you require may influence the most cost-effective option for your business.
Time Constraints - Some printing techniques may have longer lead times than others, so consider your project timeline when choosing a printing method.
Durability and Resistance - If your tin cans will undergo harsh handling or environments, consider printing techniques that offer durability, and resistance to fading, or scratching.
Common Printing Techniques for Custom Tin Cans
Offset Printing

Offset printing, also known as lithography, is a widely used commercial printing technique for producing high-quality prints. It involves transferring ink from a printing plate to a rubber blanket, and then onto the final printing surface, typically paper or cardstock.
Here is a step-by-step breakdown of the offset printing process:
- Prepress: The process begins with prepress activities, where the artwork or design is prepared for printing. This includes typesetting, image manipulation, color separation, and creating printing plates.
- Plate making: Printing plates are typically made from aluminum or polyester. These plates contain the image or text to be printed. The plates are chemically treated to attract ink to the image areas and repel it from the non-image areas.
- Ink application: The ink is applied to the plate using rollers. The ink adheres to the image areas while being repelled by the non-image areas.
- Transfer to the blanket: The inked image on the plate is transferred to a rubber blanket. The blanket is then pressed against the printing surface, which could be paper, cardstock, or other materials.
- Printing: The blanket, with the inked image, is pressed against the printing surface, transferring the ink. The printing surface is fed through the printing press, and each color is applied separately in a series of passes.
- Drying and finishing: After printing, the printed material goes through a drying process to allow the ink to set. Additional finishing processes like cutting, folding, binding, or varnishing may be applied depending on the desired end product.
Advantages and Limitations of Offset Printing

Advantages
High quality: Offset printing provides excellent image quality and sharpness, making it ideal for tin cans that require intricate designs or detailed graphics.
Color accuracy: Offset printing allows for precise color reproduction, ensuring consistent and accurate colors on tin cans.
Cost-effective for large quantities: Offset printing becomes more cost-effective as the print volume increases, making it suitable for large production runs of tin cans.
Versatility: Offset printing can be used on a wide range of materials, including metal, paper, and plastics, offering flexibility in tin can printing.
Limitations
Setup time and cost: Offset printing requires initial setup time and cost, including plate creation and press setup. This makes it less suitable for small print runs or one-time jobs.
Not suitable for variable data: Offset printing is not ideal for printing variable data on tin cans, such as individual names or serial numbers, as each printing plate has a fixed image.
Longer production time: Offset printing involves multiple steps and drying time, leading to longer production time compared to other printing methods.
Best Practices and Tips for Offset Printing

Prepare high-resolution artwork: To achieve the best print quality, ensure that your artwork or design is of high resolution (at least 300 DPI) and in the appropriate color mode (CMYK for full-color printing).
Choose appropriate materials: Select tin cans with a surface suitable for offset printing, ensuring that they are clean, smooth, and properly prepared for printing.
Work with experienced printers: Collaborate with experienced offset printers who have expertise in tin can printing. They can provide guidance on design considerations, color management, and production techniques.
Perform color calibration: Ensure that the offset printing press is properly calibrated for color accuracy. This involves regular maintenance of the equipment and periodic color checks.
Proofing and quality control: Request print proofs to review and approve before full production. Implement quality control measures throughout the printing process to identify and address any issues promptly.
Consider finishing options: Explore additional finishing options like varnishing or coating to enhance the visual appeal and durability of the printed tin cans.
Plan for lead times: Offset printing often requires longer lead times compared to digital printing. Factor in the production time and delivery schedules when planning your tin can printing project.
It's important to note that specific practices may vary depending on the equipment, materials, and printing requirements. Working closely with your chosen printer will ensure the best results for your offset printing of tin cans.
Digital Printing

Digital printing is a modern printing method that involves the direct transfer of digital files onto a printing surface, such as tin cans, without the need for traditional printing plates. It offers a more streamlined and efficient printing process compared to offset printing.
Here is a simplified overview of the digital printing process:
- File preparation: The artwork or design is created or prepared digitally using graphic design software. The file is typically saved in a high-resolution format (300 DPI) with the appropriate color mode (CMYK for full-color printing).
- Printing setup: The digital printing press is prepared by calibrating and configuring the equipment according to the desired print specifications. This includes selecting the appropriate ink type, setting color profiles, and adjusting print settings.
- Ink application: The digital printing press applies ink directly onto the surface of the tin cans using inkjet or laser technology. The ink is applied in precise droplets or sprayed onto the cans based on the digital file instructions.
- Printing and curing: The tin cans are fed through the digital printing press, and the ink is deposited onto the cans to create the desired design. Some digital presses have built-in drying or curing units that instantly dry or cure the ink as it is applied.
- Finishing: After printing, the tin cans may undergo additional finishing processes such as coating, varnishing, or embossing to enhance their appearance and durability.
Advantages and Limitations of Digital Printing

Advantages
Quick turnaround time: Digital printing eliminates the need for plate creation and setup, allowing for faster production turnaround times. It is suitable for small to medium print runs or on-demand printing.
Variable data printing: Digital printing excels at printing variable data, such as individual names or serial numbers, on tin cans. Each can can have a unique design or information without incurring additional setup costs.
Cost-effective for short runs: Digital printing is cost-effective for smaller print quantities since there are no plate costs or setup fees involved. It is ideal for personalized or limited-edition tin cans.
High-quality prints: Digital printing offers excellent print quality with sharp details, vibrant colors, and smooth gradients. It can reproduce complex designs, textures, and photographic images effectively.
Limitations
Limited color gamut: The color gamut of digital printing may be slightly narrower compared to offset printing, resulting in some color variation. However, advancements in digital printing technology have significantly improved color accuracy.
Limited substrate options: Digital printing works best on smooth surfaces, so the range of suitable tin can materials may be more limited compared to offset printing. Rough or textured surfaces may not be compatible with digital printing.
Production speed for large runs: Digital printing may not be as efficient for large print runs due to the time required for individual can printing. Offset printing can be more time-efficient for high-volume production.
Cost per unit for large runs: While digital printing is cost-effective for short runs, the cost per unit can be higher compared to offset printing for large quantities due to the higher ink costs associated with digital technology.
Best Practices and Tips for Digital Printing

Use high-resolution artwork: To ensure sharp and clear prints, provide digital files in high resolution (at least 300 DPI) with proper color mode (CMYK) and color profiles.
Perform color calibration: Calibrate the digital printing press regularly to maintain color accuracy. Monitor color consistency by periodically comparing printed samples to the desired color standards.
Choose suitable tin can materials: Select tin cans with smooth and compatible surfaces for digital printing. Consult with your printer to determine the best materials for achieving optimal print quality.
Test print and proofing: Request test prints or proofs to evaluate the print quality, color accuracy, and overall appearance of the tin cans before full production. Make any necessary adjustments or corrections based on the proofing stage.
Optimize design for digital printing: Consider the capabilities and limitations of digital printing when designing for tin cans. Avoid intricate or fine details that may be challenging to reproduce accurately. Opt for bold and vibrant colors for the best results.
Finishing options: Explore additional finishing options like coatings or varnishes to enhance the appearance and durability of the printed tin cans. Discuss these options with your printer to determine the most suitable finishes.
Collaboration with a reputable printer: Work with a reliable and experienced digital printing service provider who specializes in printing on tin cans. They can provide valuable insights, recommendations, and guidance to achieve optimal results.
Remember that digital printing technology is continually advancing, and specific practices may vary depending on the equipment and materials used. Open communication and collaboration with your printer will help ensure the best possible outcome for your digital printing on tin cans.
Screen Printing

Screen printing, also known as silk screening, is a versatile printing technique that involves transferring ink through a mesh screen onto a substrate, such as tin cans. It is a popular method for printing on various materials, including metal, fabric, plastic, and paper.
Here is a step-by-step breakdown of the screen printing process:
- Design preparation: The artwork or design to be printed is prepared digitally or hand-drawn. It is then converted into a stencil or screen, typically made of a fine mesh material such as nylon or polyester.
- Screen preparation: The screen is coated with a light-sensitive emulsion. The design is transferred onto the screen using a film positive or stencil. The emulsion is exposed to UV light, hardening the areas not covered by the design.
- Ink preparation: The desired ink colors are prepared by mixing pigments with a screen printing medium or binder. The ink should have the appropriate consistency for smooth application through the screen.
- Printing setup: The prepared screen is mounted onto a screen printing press or machine. The tin cans are securely positioned on a flat surface or fixture beneath the screen.
- Ink application: The ink is placed on the top edge of the screen, and a squeegee is used to pull the ink across the screen, forcing it through the open areas of the stencil onto the tin cans. The squeegee is typically held at a 45-degree angle and applied with consistent pressure.
- Multiple colors or layers: If multiple colors or layers are required, the process is repeated with additional screens and stencils. Each color is printed separately, allowing time for drying between each layer.
- Drying and curing: Once the printing is complete, the tin cans are allowed to dry naturally or are passed through a drying/curing unit, depending on the ink type used. Curing ensures that the ink adheres properly to the cans and becomes resistant to abrasion or fading.
Advantages and Limitations of Screen Printing

Advantages
Durability: Screen printing inks are typically thick and provide excellent durability, making them suitable for tin cans that may undergo handling, transportation, or exposure to harsh conditions.
Vibrant and opaque colors: Screen printing allows for vibrant and opaque colors to be applied to tin cans, resulting in bold and eye-catching designs.
Versatility: Screen printing can be used on various shapes and sizes of tin cans. It can accommodate irregular surfaces and can print on both flat and curved areas.
Cost-effective for medium to large runs: Screen printing becomes more cost-effective as the print volume increases, making it suitable for medium to large production runs of tin cans.
Limitations
Limited detail and resolution: Screen printing is not as suitable for designs with fine details, gradients, or small text. The nature of the process may result in less sharpness and precision compared to digital or offset printing.
Setup time and cost: Screen printing requires initial setup time and cost, including screen preparation and alignment for each color or layer. It may not be ideal for small print runs or one-time jobs.
Longer production time: Screen printing involves multiple steps, including drying or curing time between each layer. This can result in longer production times compared to other printing methods.
Best Practices and Tips for Screen Printing

Prepare high-quality screens: Ensure that the screens are properly prepared and coated with the appropriate emulsion for optimal ink transfer. Regularly inspect and maintain the screens to prevent clogging or deterioration.
Choose suitable inks and additives: Select screen printing inks specifically formulated for metal substrates. Consider using additives or modifiers to improve ink flow, adhesion, and cure time.
Proper alignment and registration: Precise alignment of screens and registration of multiple colors or layers is crucial for achieving accurate and well-aligned prints. Use registration marks and ensure consistent positioning during the printing process.
Test prints and proofing: Conduct test prints and proofing to evaluate the print quality, color accuracy, and registration before full production. Make necessary adjustments or corrections based on the test results.
Proper curing and drying: Follow the recommended curing and drying guidelines for the chosen ink type. Ensure that the cans are adequately dried and cured to achieve maximum durability and resistance to abrasion or fading.
Maintain cleanliness and hygiene: Keep the printing area, screens, and tools clean to prevent any contamination or interference with the ink transfer. Regularly clean screens, squeegees, and other equipment to maintain optimal print quality.
Collaborate with experienced printers: Work with experienced screen printing professionals who have expertise in printing on tin cans. They can provide guidance on design considerations, ink selection, and production techniques.
It's important to note that specific practices may vary depending on the equipment, materials, and printing requirements. Working closely with a reputable screen printing service provider will ensure the best results for your tin can printing project.
Heat Transfer Printing

Heat transfer printing, also known as thermal transfer printing, is a method that involves transferring a design or image from a carrier film or paper to a substrate, such as tin cans, using heat and pressure. It is commonly used for printing on various materials, including fabrics, ceramics, plastics, and metals.
Here is a step-by-step breakdown of the heat transfer printing process:
- Design preparation: The artwork or design is prepared digitally and printed onto a carrier film or paper using specialized heat transfer inks. The design is typically reversed or mirrored since it will be transferred onto the tin cans in reverse.
- Transfer setup: The carrier film or paper with the printed design is positioned on top of the tin cans, with the design facing the cans. The film or paper is carefully aligned to ensure accurate placement and registration.
- Heat transfer process: Heat and pressure are applied to the carrier film or paper using a heat transfer press or machine. The heat causes the ink on the carrier to liquefy, and the pressure forces the ink to transfer from the carrier onto the tin cans.
- Cooling and removal: After the transfer process, the tin cans are allowed to cool down, which solidifies the transferred ink. The carrier film or paper is then peeled off, leaving behind the printed design on the cans.
Advantages and Limitations of Heat Transfer Printing

Advantages
Versatility: Heat transfer printing can be used on various shapes and sizes of tin cans, including those with curved or irregular surfaces. It allows for precise and detailed designs to be transferred onto the cans.
Full-color capability: Heat transfer printing can achieve vibrant and full-color prints, including complex designs, gradients, and photographic images.
Durability: The transferred ink in heat transfer printing is usually durable and resistant to fading, scratching, and wear. It can withstand normal handling and environmental conditions.
Cost-effective for small to medium runs: Heat transfer printing is cost-effective for smaller to medium-sized print runs, making it suitable for personalized or limited-edition tin cans.
Limitations
Limited texture or special effects: Heat transfer printing may not be able to replicate certain textures or special effects that can be achieved with other printing methods, such as embossing or raised printing.
Production speed for large runs: Heat transfer printing is generally slower compared to other high-speed printing methods like screen printing or digital printing. It may not be as efficient for large-volume production.
Setup and equipment requirements: Heat transfer printing requires specialized equipment, such as heat transfer presses or machines, which may require initial setup and investment costs.
Potential for misalignment: Accurate alignment and registration of the carrier film or paper onto the tin cans are crucial for achieving precise prints. Misalignment or improper pressure application can result in imperfect transfers.
Best Practices and Tips for Heat Transfer Printing

Use high-quality carrier films or papers: Choose carrier films or papers specifically designed for heat transfer printing on metal substrates. Ensure they have good ink adhesion and are compatible with the chosen heat transfer inks.
Optimize design for heat transfer: Prepare the design with the appropriate color profile and resolution for heat transfer printing. Consider the limitations of the process, such as the inability to achieve textures or certain special effects, and design accordingly.
Proper alignment and pressure: Ensure accurate alignment and registration of the carrier film or paper onto the tin cans. Use guides or registration marks to assist with alignment. Apply consistent and appropriate pressure during the heat transfer process to achieve even and complete ink transfer.
Test prints and proofing: Conduct test prints and proofing to evaluate the print quality, color accuracy, and durability of the heat transfers. Test on representative tin cans to verify the results before full production.
Follow recommended heat and pressure settings: Consult the guidelines provided by the heat transfer ink and equipment manufacturers for recommended heat and pressure settings. Test different settings if needed to achieve the desired print quality.
Allow sufficient cooling time: Ensure that the tin cans are adequately cooled before removing the carrier film or paper. This allows the transferred ink to solidify and adhere properly to the cans.
Quality control and inspection: Implement quality control measures to inspect the printed tin cans for any defects, misalignments, or inconsistencies. Remove any defective cans before packaging or shipping.
Collaborating with an experienced heat transfer printing service provider can also provide valuable insights and guidance to achieve optimal results for your tin can printing project.
Embossing and Debossing

Embossing and debossing are techniques used to create raised or recessed designs on the surface of tin cans. They add a three-dimensional tactile element to the printed design, enhancing its visual appeal and texture. These techniques involve the use of specialized dies and pressure to create the desired effect.
Embossing - In embossing, the design is raised or elevated above the surface of the tin can. It creates a raised impression by pressing the metal from the backside or utilizing a male die and a counter die. The result is a design that stands out and catches the light.
Debossing - In debossing, the design is pressed into the surface of the tin can, creating a depressed or sunken effect. It involves using a female die and a counter die to push the metal downward, resulting in a design that is recessed below the surrounding surface.
Both embossing and debossing can be used individually or in combination with other printing techniques, such as screen printing or heat transfer printing, to create visually striking and textured designs on tin cans.
Advantages and Limitations of Embossing and Debossing

Advantages
Visual and tactile appeal: Embossing and debossing add depth and texture to the tin can design, making it visually appealing and engaging. The raised or recessed areas can catch the light and create a unique tactile experience for consumers.
Enhances brand perception: The use of embossing and debossing techniques can elevate the perceived value and quality of the tin cans. It adds a premium and sophisticated touch, making the packaging stand out on the shelf.
Durable and long-lasting: Embossed or debossed designs on tin cans are highly durable and resistant to wear, as they are physically pressed into the metal surface. They can withstand handling, transportation, and various environmental conditions.
Limitations
Design limitations: Embossing and debossing may not be suitable for intricate or highly detailed designs, as fine details can be challenging to replicate accurately in the raised or recessed form.
Cost and complexity: These techniques require specialized dies and equipment, which can increase the production cost compared to standard printing methods. The setup and production process for embossing and debossing may also be more complex and time-consuming.
Limitations on tin can shape: The shape and surface of the tin can may impose limitations on the areas where embossing or debossing can be applied. Curved or irregular surfaces may require more intricate die designs or may not be suitable for these techniques.
Best Practices and Tips for Embossing and Debossing

Collaborate with experienced professionals: Work with experienced printers or packaging specialists who have expertise in embossing and debossing techniques specifically for tin cans. They can provide guidance on design considerations, die preparation, and production techniques.
Design with embossing/debossing in mind: When creating the artwork, consider the specific requirements and limitations of embossing or debossing. Use bold, simplified designs and avoid small or intricate details that may not translate well in the raised or recessed form.
Choose suitable tin can materials: Select tin can materials that are compatible with embossing and debossing techniques. Discuss with your printer or supplier to ensure that the materials can withstand the pressure and maintain the integrity of the raised or recessed design.
Optimize die preparation: Pay attention to the die design and preparation process. Proper die craftsmanship and precision are crucial for achieving clean and accurate embossed or debossed designs. Collaborate closely with the die maker to ensure optimal results.
Test and proofing: Conduct test runs and proofing to evaluate the embossing or debossing results before full production. Test on representative tin cans to check for any issues with alignment, depth, or clarity of the design.
Quality control and inspection: Implement quality control measures to inspect the embossed or debossed tin cans for any defects or inconsistencies. Remove any imperfect cans before packaging or shipping.
It's important to note that embossing and debossing are specialized techniques that require expertise and precision. Working closely with professionals and conducting thorough testing will help you achieve optimal results for your embossed or debossed tin can designs.
Choosing the Right Printing Technique

- Simple designs with limited colors and budget constraints: Screen printing can be a suitable option for simple designs with solid colors. It offers cost-effective printing for large volumes and can handle a variety of substrates, including tin cans.
- Intricate designs with full-color requirements: Digital printing provides high-quality and full-color prints, making it suitable for complex designs, gradients, or photographic images. It is more cost-effective for smaller print runs and offers flexibility in customization.
- Premium or luxury packaging with tactile elements: Embossing and debossing techniques can add a tactile and premium touch to tin can designs. They are effective for creating raised or recessed designs and enhancing brand perception.
- Customization and personalization: Heat transfer printing allows for easy customization and personalization of tin cans. It is suitable for smaller print runs and offers the ability to print individual names, images, or variable data.
- High-quality and detailed prints: Lithographic printing, also known as offset printing, is a versatile technique that can achieve high-quality prints with fine details and color accuracy. It is suitable for larger print runs and offers a wide range of color options.
Future Trends in Custom Tin Can Printing

Emerging Technologies and Innovations in Tin Can Printing
- Digital printing advancements: Digital printing continues to evolve, offering improved print quality, faster production speeds, and expanded color gamuts. Advancements in inkjet technology and UV-curable inks enable digital printers to achieve higher resolutions and better color accuracy, making it an increasingly popular choice for custom tin can printing.
- 3D printing: While still in the early stages, 3D printing holds potential for custom tin can printing. It allows for intricate and unique designs that can be produced on-demand, opening up possibilities for personalized or limited-edition tin can packaging.
- Sustainable printing solutions: As sustainability becomes a more significant concern, there is a growing interest in eco-friendly printing solutions for tin cans. This includes the development of biodegradable or recyclable inks, water-based inks, and printing processes that minimize waste and energy consumption.
- Smart packaging integration: With the rise of smart packaging, there is potential for integrating technology into custom tin can printing. This could involve incorporating printed sensors, NFC (Near Field Communication) tags, or QR codes on tin cans, enabling interactive and personalized experiences for consumers.
Predictions for the Future of Custom Tin Can Printing

- Increased customization options: Customization will continue to be a significant trend in tin can printing. Customers will have more options to personalize their packaging, such as adding individual names, messages, or unique designs, thanks to advancements in digital printing and variable data printing technologies.
- Augmented reality (AR) integration: Tin can printing may incorporate AR elements, allowing consumers to use their smartphones or devices to access additional content, such as product information, interactive games, or virtual experiences. This can enhance brand engagement and create memorable interactions with the packaging.
- Interactive and dynamic designs: Future tin can printing may involve animated or dynamic designs that change based on environmental factors or user interactions. This could be achieved through technologies like electroluminescent inks, thermochromic inks, or electronic displays integrated into the can's surface.
- Enhanced anti-counterfeiting measures: As counterfeiting remains a concern, tin can printing may include advanced anti-counterfeiting features. This could involve incorporating unique codes, holographic elements, or tamper-evident printing techniques to ensure product authenticity and consumer trust.
- Sustainable and eco-conscious printing practices: With the increasing focus on sustainability, the future of tin can printing will likely involve the adoption of more environmentally friendly printing processes, such as water-based inks, renewable energy-powered production facilities, and recyclable or compostable packaging materials.
While these predictions offer insights into potential future trends in custom tin can printing, it's important to note that the actual implementation and adoption of these advancements may vary and depend on factors like market demand, technological feasibility, and industry regulations.
Conclusion
Custom tin can printing offers a unique and eye-catching way to enhance your branding and marketing efforts. By carefully selecting the right printing technique, collaborating with experts, and ensuring quality control, you can create visually appealing tin can packaging that captures attention and leaves a lasting impression on your customers. Embrace the possibilities of customization, innovative technologies, and sustainability in your tin can printing to stand out in a competitive market.